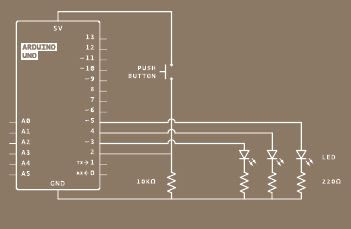
We introduced ourselves to Digital Inputs (here) and we
tried our hands with an interactive project that takes action with the push of
a button. Now we will be extending that design to something a bit more. We will
go design a system using digital input to mimic a 1970s spaceship interface. You’ll make a cool control panel with a
switch and lights that turn on
when you press the switch. You can decide
whether the lights mean “Engage Hyperdrive” or “Fire the lasers!”. A green LED will be on, until you press a
button. When the Arduino gets a signal from the button, the green light will
turn off and 2 other lights will start blinking.
Let us build the circuit
In the previous example, we did not use
resistors with the switch because we set the switch pinMode to INPUT_PULLUP,
doing things activates the internal resistor on the pin on the Arduino board. When
we did that, the pin had a default value of HIGH and when we pressed the
button, the value became LOW. By using resistors, we have a similar but
opposite effect same effect. Here we set the pinMode to INPUT and then wiring
an external resistor to the pin as we have done in the circuit above. Doing this ensures the pin default value is
LOW and then when we press the button, the value will be HIGH.
So let me give you an easy reminder, for a
pushbutton switch;
If pinMode is INPUT_PULLUP, we
don’t need an external resistor then default value is HIGH
If pinMode is INPUT, we need an
external PULL DOWN resistor and default value is LOW
Now, this code is one of the codes in the
Arduino IDE, to locate it; go to File->
Examples-> 10.Starter_kit Basic_kit-> p02_SpaceshipInterface.
- · The setup() runs once, when the Arduino is first powered on. This is where you configure the digital pins to be either inputs or outputs using a function named pinMode(). The pins connected to LEDs will be OUTPUTs and the switch pin will be an INPUT.
- · The loop() runs continuously after the setup() has completed. The loop() is where you’ll check for voltage on the inputs, and turn outputs on and off. To check the voltage level on a digital input, you use the function digitalRead() that checks the chosen pin for voltage. To know what pin to check, digitalRead() expects an argument. Arguments are information that you pass to functions, telling them how they should do their job. For example, digitalRead() needs one argument: what pin to check. In your program, digitalRead() is going to check the state of pin 2 and store the value in the switchState variable. If there’s voltage on the pin when digitalRead() is called, the switchState variable will get the value HIGH (or 1). If there is no voltage on the pin, switchState will get the value LOW (or 0).
- · Above, you used the word if to check the state of something (namely, the switch position). An if() statement in programming compares two things, and determines whether the comparison is true or false. Then it performs actions you tell it to do. When comparing two things in programming, you use two equal signs (==). If you use only one = sign, you will be setting a value instead of comparing it.
- · digitalWrite() is the command that allows you to send 5V or 0V to an output pin. digitalWrite() takes two arguments: what pin to control, and what value to set that pin, HIGH or LOW. So when we write our if() statement, we include the action we want to happen. This is where we tell the green LED to stay ON (HIGH) while the red LEDs are OFF (LOW).
- · You’ve told the Arduino what to do when the switch is open. Now define what happens when the switch is closed. The if() statement has an optional else component that allows for something to happen if the original condition is not met. In this case, since you checked to see if the switch was LOW, write code for the HIGH condition after the else statement. This is where we tell the red LEDs to alternate between themselves coming ON (HIGH) and going OFF (LOW) while the green LED stays OFF (LOW).
- · After setting the LEDs to a certain state, you’ll want the Arduino to pause for a moment before changing them back. If you don’t wait, the lights will go back and forth so fast that it will appear as if they are just a little dim, not on and off. This is because the Arduino goes through its loop() thousands of times each second, and the LED will be turned on and off quicker than we can perceive. The delay() function lets you stop the Arduino from executing anything for a period of time. delay() takes an argument that determines the number of milliseconds before it executes the next set of code. There are 1000 milliseconds in one second. delay(250) will pause for a quarter second.
Once your Arduino is programmed, you should see the green
light turn on. When you press the switch, the red lights will start flashing,
and the green light will turn off. Try changing the time of the two delay()
functions; notice what happens to the lights and how the response of the system
changes depending on the speed of the flashing. I urge you to think of ways to
make this bigger, maybe add more switches and LEDs and using the if() –else statements, you can add more
actions too. Ciao!


No comments:
Post a Comment